- Dec 3, 2024
- 3 min read
Updated: Dec 6, 2024
Good old Ginders—he knows what we need this festive period, and it’s some helluva fancy napkin folding. What more could your table need after you’ve perfected the Waiter’s Jacket or the Elf’s Shoe (yes, both are below)? So come one, come all, and share your attempts at these masterpieces of folding!

Cock’s Comb

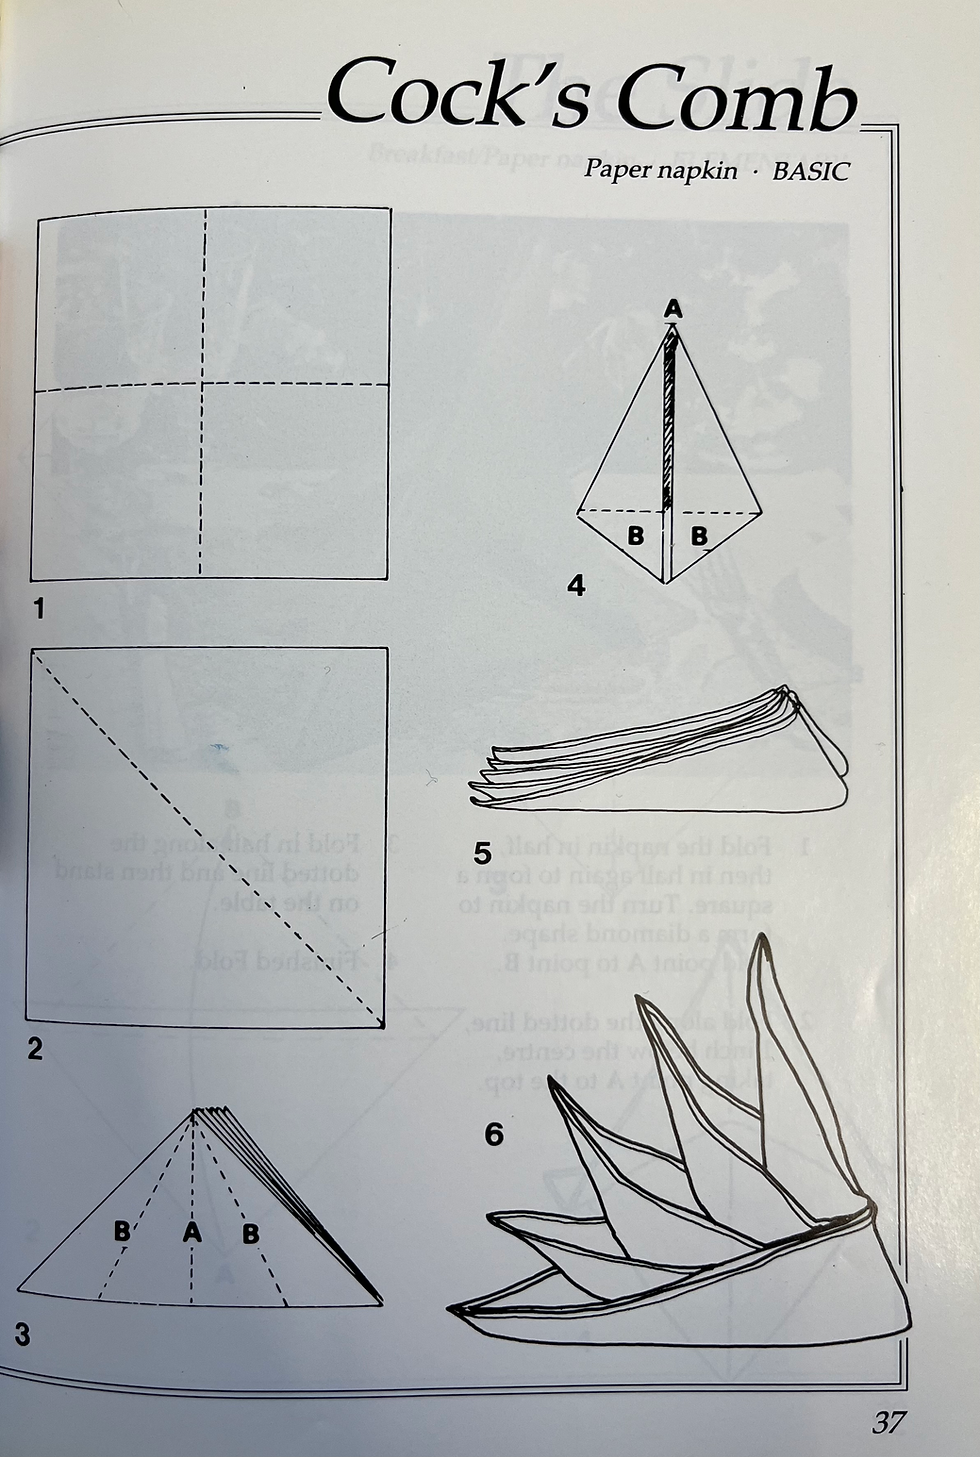
Instructions
Fold as indicated by dotted lines.
Fold diagonally.
Turn napkin so that points are away from you. Fold sides B along dotted line to meet at centre A.
Turn the points of B under.
Fold along the centre line A and stand the napkin with fold uppermost.
Pull up the four pleats and arrange to produce the Finished Fold.
The Fleur-de-lys(1)


Instructions
Fold the napkin in half to form a triangle.
Fold the points to the rear along the dotted line as shown.
Pleat the napkin right across from left to right. 4 Open out the pleats and arrange in a small glass or napkin ring.
Candle Fan


Instructions
Lay the napkin flat.
Fold edges A and C to centre line B.
Crease as shown by dotted line.
Fold out the 4 corners diagonally.
Tightly roll from the top to the centre line. Pleat the remainder.
Fold in half as shown.
Arrange in glass. This fold may be decorated with a sprig of holly at Christmas.
The Gondola


Instructions
Lay the napkin flat, and cover half with greaseproof paper or kitchen foil. Fold at line A.
Fold corners A diagonally to centre line B.
Fold corners C diagonally to centre line B.
Fold corners D diagonally to centre line B.
Napkin after fold 4.
Turn the napkin as shown, hold firmly with the left hand, and pull the point up at 1 inch (25mm) intervals to produce a fold, as shown in sequence 7.
7 Finished Fold.
Two such folds may be joined by using a third napkin, as shown, to produce a complete Gondola.
The Waiter’s Jacket


Instructions
Fold the napkin into three.
Turn down top edge twice making a 1 inch fold.
Turn napkin over.
Fold corner A to centre B.
Fold C down and attach bow tie
Fold D at dotted line behind.
Fold E at dotted line.
Open fold D and E this will help the napkin stand upright.
Waterfall


Instructions
Lay napkin flat.
Fold as indicated.
Place napkin with base CC towards you and pleat vertically, from left to right.
Napkin after stage 3.
Place in a glass, bring down the front fold to expose the inside pleats, arrange as shown.
The Elf Shoe


Instructions
Lay napkin flat, and fold in three along the dotted lines.
Fold in half along the dotted line.
Fold corners A and B down along the dotted lines.
Fold corners C and D to the centre line.
5 . Turn ends A and B up twice as indicated by the lines.
6. Fold in half along the centre line. Turn corners A and B.
Napkin after stage 6. Tuck in corner AB.
Turn napkin over and arrange on the table with the toe towards the diner.
Cinderella’s Slipper


Instructions
Fold napkin into three.
Fold at lines A to bring sides B to the centre.
Napkin after stage 2.
4. Turn the point to the right, folding along the centre line.
Turn the napkin over, fold the portion BB up and away from you at the dotted line shown in previous diagram.
Fold CC in half towards you; this will make the heel.
Fold CC around and tuck into pleat D.
To finish this fold, insert the fingers between the folds and curl this part around the slipper.
Envelope


Instructions
Fold the napkin into three equal widths.
Fold the top layer up one-third as shown.
Fold in half with the pleat inside, then fold A to C and B to D.
Napkin after stage 3.
Now fold back E in a diamond as shown by dotted lines in diagram 4.
Repeat the previous fold to complete the envelope.
Rabbit


Instructions
Fold the napkin into three parts as indicated.
Fold along the dotted lines to bring edges to the centre.
Fold the corners up along the dotted lines.
Fold the left and right corners in along the dotted lines.
Turn napkin over and then upside down.
Turn up bottom point as shown.
Turn the left and right corners backwards, slip one corner into the other to fasten. Open out the ears first, then the base, and stand on the place mat.
The Duck


Instructions
Lay napkin flat fold at line A.
Fold corners A diagonally to centre line B.
Fold corners C diagonally to centre line B.
Fold corners D diagonally to centre line B.
Napkin after fold 4.
Now shape fold as the completed drawing.


Comments